Friday, December 25, 2009

Mixed Media

The past two months I have been working on Mixed Media as well as pottery. This past year I joined the Palouse Women Artists Organization. It is a supportive and energetic group. I've enjoyed it a lot. Among other activities they give "assignments" of themes to work on and arrange shows following these themes. Some of these shows are for two dimensional art because they all have to go on a wall rather than on sculpture stands. The potters and sculptors have a choice of making a hanging work, which I've done too, or try some flat art.
I have been frustrated with the reception my pottery has recieved over the past year and was ready to try something new. No plans for a permanent switch, but getting the brain cells shaken up by doing something different seemed like a good idea.
I have always drawn, but for my own enjoyment and not intended for show, they stay firmly in a sketch book. I've also worked on and off on altered books for a few years, but I've never been totally satisfied with them. For these collage-mixed media works I used some of my most successful altered book techniques.

Title: "Softly Winged the Raven"

This mixed media piece was for the PWA show "The Road Less Traveled". There are so many layers of materials I don't think I could recount the process. The title comes from one of the found poems that are included in the collage.


"Untitled"

Hoping to decide on a title, it just hasn't occured to me quite yet. This Collage is for the PWA show titled "Joy". I was very reluctant to try anything with a "joy" theme. I haven't felt joyful and forced joy would not come out well. Anything I didn't feel would end up sappy and I was determined to have a real content. I felt this was successful, it is a positive, energetic design. My thoughts were how much I enjoy the looks of the horses in cave paintings and the shapes of dancers leaping. The PWA show will be hung in January.

Friday, September 4, 2009

Quick Brick Backyard Oven

QUICK BRICK BACKYARD BREAD OVEN
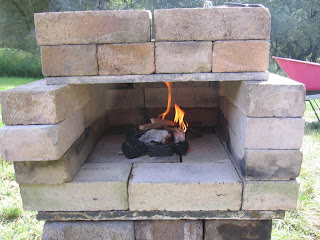
the completed oven in it's "shabby chic" glory

It seems like Potters love fire. Those enigmatic flames and smoke remain a mystery and a wonder even if we know much of the science of why they do what they do. Often this interest in the changes brought about by fire and smoke includes an interested in cooking.
I’ve heard of a potter claim that he makes great bread in his kiln. I couldn’t help but wonder what flour and yeast ash glaze looks like? But of course, cooking in ovens that are heated with wood was what we humans did for thousands of years before the present day. During the European Middle Ages the shape of the kiln was very similar to the shape of the bread oven.

Even in the not-too-distant past using wood as fuel was about the only option for cooking. My dad always said bread baked in an old-fashioned wood cook range was better than any other kind. Dad was not a nostalgic person as a rule, what he liked was that touch of smoke and the texture created by heat coming from all the sides surrounding the bread while it baked. For my friends and me, a lot of the enjoyment of camping trips is planning and preparing the meals. We consider that although smoky camp cooking takes much more time than food preparation in a modern kitchen, it is more than worth the trouble.

The oven with a fire just started.

When Kelly Avrill Savino posted on the Clayart list about the cob oven she made in her backyard along with clear photos and directions, I was enthralled and since then have wondered about making one of my own. Her oven was and is inspiring. http://www.primalmommy.com/earthoven.html
However, because I no longer have kids living at home and I don’t bake bread or pizza often enough to make an elaborate cob oven this was not a good decision for me. I enjoy occasionally baking bread and during those times wished I had a great outdoor oven.
Recently a friend sent me a web page titled “The One Hour Bread Oven”. http://people.umass.edu/dac/projects/BrickOven/Instant_BrickOven.htm
As I looked at it I realized that with a few tweaks, this was a perfect solution for a busy potter and could become a reality.
Most of the materials for this were lying in various places around my studio area.


The oven with the chamber opening bricked up with the bread dough inside.

As I began to plan this oven I made a personal rule that only materials already on my property could be used. The only difficulty I had was finding enough concrete blocks. It happened that what I had on hand was quite a good amount, which would be an appropriate size for my use.

Building the Quick Brick Backyard Bread Oven:
The Quick Brick oven took longer than an hour, but only because I had to scrounge up the materials, haul them to the area in which I wanted to build it, and then scrub the dirt off of them. If the materials had been all ready to go the construction would have taken less than an hour.

Materials:
12 cement blocks, 2 kiln shelves, 41 fire bricks.
Other tools: kitchen tongs, garden hoe, work gloves.

I found two different widths of cement blocks; however, they were the same height so the only disadvantage was lack of the look of symmetry. I used six cement blocks for the base and six for the second layer. I wanted two layers of cement blocks so I did not have to bend down so far to stoke the fire and to place the food in the oven.
I also gathered fire bricks and two kiln shelves. One kiln shelf was slightly warped and cracked, while the other was new and straight, but it did not fit efficiently in my kilns. These two shelves happened to be silicon carbide. Everything but the shelves had been sitting outside. So I scrubbed them all, including the shelves, with a rag and soapy water. I changed the wash water frequently.
To begin the process I found the least uneven spot possible in the back yard on which to construct the oven.
The first layer was the concrete blocks. I placed six on the ground, then using a different lattice, I laid six more concrete blocks on top of the first layer.
Next came the warped kiln shelf. It was about the right size to cover the blocks and NOT so warped that it would cause rocking.
Next came a layer of 12 fire brick to cover the kiln shelf. These fire brick constitute the floor of the oven.
Around the edge of the kiln shelf I stacked three layers of firebrick, a total of 18. They formed three sides of a rectangle. The fourth side is the mouth of the oven and is left open until food is placed in the oven. I thought three bricks would be high enough for any loaf I might bake.
Then I lay the second kiln shelf on top of the brick rectangle. This constituted the lid of the oven,
A layer of 8 firebricks were laid on the top of the kiln shelf.
Three last firebricks were left to be the cover, or door to keep the heat in after the bread is placed in the oven.


The bread is baked!


You have probably thought of a couple of questions about this structure.
There is no mortar, so there are gaps between the bricks and kiln shelves. Heat escapes through the gaps, but not too quickly. Bread still has time to bake. The firebricks hold heat effectively once they have heated up sufficiently. If a tighter oven is desired, a coil of clay would chink the most gaping of holes.
The oven is uneven and just sitting on top of the ground. As the earth moves slightly over time, the bricks will move even farther apart. If it becomes too crooked, because there is no mortar, it is easy to re-stack, or even completely re-build in a short time.


A closer view of the loaf. It was 4" at it's thickest and was done throughout.

Using the Quick Brick Backyard Oven for bread:
*To start the fire, use a few pieces of hardwood lump charcoal in a BBQ then transfer several nicely burning pieces to the oven chamber using kitchen tongs.
*Then several pieces of kindling are laid over the coals in a teepee shape until they catch fire.
*After starting the fire, the only fuel used is small dried branches and twigs from my trees. This was wood that I would have burnt in a leaf pile or hauled away.
*The small size of wood pieces burn very quickly, meaning the fire has to be fed frequently. I was gifted a bellows some time ago and use it to keep the fire burning well.
*The door bricks are moved close to the oven chamber so they also get hot.
*After at least 2 hours of heating, I hold my hand in the oven chamber. If it is too hot to keep my hand in after 3 second that is about right.
*After the bricks have heated up, the bread is brought near the oven.
*The ashes are scraped out as fast and as completely as possible with the use of a garden hoe.
*The bread should be placed in the oven towards the center. There will be a small bit of ash there, this might even add a little interesting flavor.
*It isn’t necessary to use a release agent, such as grease or cornmeal on the bricks, the bread comes off easily after it is baked.
*It is still important to work fast, have the work gloves near by, I put them on quickly and close the opening using the three bricks reserved for the door.
*Avoid Peeking for at least 50 minutes. This is the most difficult step of the entire process.
* I Check for doneness in about 50 minutes by taking one brick away. A flashlight is helpful to see in the dark interior. If the bread isn’t nicely browned, I quickly reposition the brick and give it another 15 minutes. Every time the door bricks are removed there will be heat loss which can not be replaced during that baking session.


Interior of loaf.

These are just my methods of building and baking in the Quick Brick Oven, they are not set in concrete. I am sure people will find their own variations in materials, structure, and baking techniques. This project is open to flexibility and creativity. I have had a wonderful time with my experiments.

Wednesday, September 2, 2009

Using mica clay

I took some photos of the ware I have been making with low-fire mica clay. This is a commercial body from New Mexico Clay Co., is supposed to be what they Pueblo Indians used for cook pots, and I wanted to experiment with it.

Here are some photos of the pots after they have been thrown and previous to firing:

A variety of Medieval Cookware, serving bowls, skillets, pipkins, chafing dishes, and more in Mica Clay

A closer view of a pipkin from the mica clay. What looks like moisture is the reflection of the mica.


I am very anxious to try these out once they are fired.


Although New Mexico Clay was a good company to work with, shipping makes this clay impractical, my plan is to prospect around here for mica clay I hope soon.

Thursday, July 16, 2009

Cooking in pottery over coals

There has been some discussion on ClayArt recently about how pottery was used on fires in history for cooking. These are some pictures of how my friends and I cook in pots on coals now days. In general this is done for a reenactment group, but often just because it is fun to do and with no costumes involved. These pots are made of cone 6 clay, but I usually fire them at about cone 4.


Supper tonight. Chicken, garlic, and cilantro stew, the ingredients are all in the pot, which is being eased into the coals. The pot gets turned regularly to keep the heat even.


This particular shape was called a pipkin in the West. I saw the same style vessel in the Field Museum in Chicago from ancient China. I glazed the interior of this pot but didn't glaze the exterior to emphasize the red clay. The stew is now simmering in this picture. I kept it simmering for about 3 & 1/2 hours.


Pottery is very efficient. To keep the stew simmering, it only needs a coal under it. Not all pipkins had such long legs, but I like the long legs to slide coals under and for balance because my brazier is dished out at an angle. I use a bellows for the coals, which is why ash is on the pot.


My friend is making cheese in a pipkin over a campfire rather than in a brazier. She says she appreciates how much easier it is to clean glazed pottery than any other kind of camping pots. In the upper left hand corner a simpler cooking pot is heating water. Fat is being rendered in the iron pot.


In this photo pork is seared for a pork-asiago cheese dish in the yellow & green pipkin. The smaller pot with the mismatched lid behind simmering behind the pork is rice. The rice cooked very well, the grains stayed separate and fluffy.


Here is another friend cooking a pork roast in his pipkin. This time using a flat bottomed brazier. Again you can see how few coals are needed for cooking in ceramics. This is the same pot that was used for making cheese in the photograph above.

Tuesday, June 9, 2009

Designs with the Celtic Motif

I have had some people ask about some of the Celtic Designs I put on my pottery. All of these designs are inspired by the ancient art of the Celts, Picts, and Norse. During their eras, their art was incised or painted on various crafts such as wood work, metal work, and on illuminated manuscripts. I take the basic design and alter it to fit on my ceramic pieces in ways that, although they were not done exactly like mine in history, enhance and beautify the ceramics on which they reside.
Although I don't know for certain, I believe I was the first person in the U.S. to put Celtic Knotwork on my pottery as surface design.


This design of a hunting Celtic Cat has been very popular.


This Celtic Horse was originally part of a manuscript.


This knotted up creature is of a Norse Design.


Leaping Celtic Stag on a mug


Occasionally I also do humans. This Irish Warrior is dressed all in plaid. Plaids were bright, (what we would consider) mismatched, and popular with Ancient Celts.


This is a large platter with a Celtic bird. The bird "may" have been representative of a peacock.


This is a running Celtic Dog, the knotwork is swirling about him.


Sunday, May 17, 2009

Furniture! made of clay

The local branch of the Women's Art Caucus issued a challenge for its members. The plan is to do a work of art with the theme of a chair. We will then hold a show this summer called, of course "Madame Chair". There will probably be some wonderfully painted chairs and sculptures using chairs as armatures. Since I love the use of clay, I decided to make clay garden stools.

This stool is about 15 & 1/2 inches tall. It will shrink by the final firing of course. The carving is inspired by a French Medieval Jug. However, the overall shape and design together remind me of African art.

This stool was inspired by my daughter, who eats, drinks, and sleeps dance. It is about 17" tall.
The Orange line was drawn with acrylic paint to give me a guideline when I do the carving. The orange line will burn out in the first firing.

A close up of the carving, I still have some finishing work to do on it or so it appears.

Because they are intended to be used and sat upon I made them thick. They used a lot of clay and it is difficult to move them from place to place. Even moving them off the wheel head was a big production. Lowering them into my big oval kiln will require help. The assistance of more than one person in addition to myself will be required. Drying time will also be a challenge, I am not certain they will be completed by the due date. Clay work takes time.

Friday, May 1, 2009

Not exactly bone china

This bowl set was made for my son, who likes skulls.

I purposefully chose the glaze of this luscious green because using black, or even white would have been too "typical.
It's fun to try some different themes. Quite a few people have expressed interest in this set so I will be making some more.

Friday, April 17, 2009

Empty Bowls, 2009

An activity that the Palouse Studio Potters do almost every year is Empty Bowls, and it is an event I really look forward to. The past two years I held small workshops where I invited friends to paint underglazes on bisqued bowls I made and donate them to the Empty Bowls. This has been a very enjoyable and worthwhile activity. The participants have a good time and have come up with wonderful results:


This bowl is by Rafaella, she is interested in learning more about maiolica. So rather than painting with underglazes directly on the bisqued bowl, I mixed a cone 6 maiolica glaze (Roy & Hesselbreth) for her to paint the glazes on top of to get that thick white background.


The delicate decorations on this bowl were painted by Tammy. She took hours to accomplish this look. She judged distances and sizes just by looking carefully.


The exterior of Daedin's bowl was inspired by Italian Renaissance Drug Jars. It looks great on bowls too. A strong design lasts through the ages.

A bowl painted by my talented son Gavin. He is a painting major in college, but this is his first use of underglazes as a medium.


A different application for me. Empty Bowls donations are a great place to experiment.


Another of my underglaze bowls. This one is also rooted in Middle Eastern ceramic design.

Saturday, March 14, 2009

Sagger barrel firing

This was my first sagger firing vase, two out of six came out without breaking. The colors on this are amazing considering there is no glaze used. The colors come from the chemicals placed in the saggar barrel. The black squiggles are from horsehair burns.


More horsehair squiggles show on this pot. It was not wrapped in aluminum foil like the red pot, so the mark of smoke is more apparent.

There is a story to this firing:
On March 1st. some other potters and I went to friend Judith's home and studio to do a sagger/barrel firing. Now, I've done plenty of pit firings, but not this. Saggers are similar to pit firings, low-temperature bisqued pots are used, most of the time terra sigilatta is applied to the bisqued pots, and finally they burn wood as in a campfire so they don't get very hot. Some of the differences, however are the other materials added to the sagger which render them non-functional, but with great and unusual surface color.


This is the vase shown in the first photo before firing.
It has been painted with ferric chloride, sprinkled with sea salt, and had a few horse hairs placed on it. It will be loosely wrapped with the aluminum foil it is sitting on and placed in the barrel.


Pots are carefully placed in the "high-tech kiln". One of the guild members is adding dried banana peels to the mix. The blue substance is Miracle Gro. The amphorae are mine.


Here it is burning. It was a cold, wet day as can be judged by the snow still on the ground.

At this point the coals were glowing, I leaned in to place horsehair on the pots. Horsehair immediately burns leaving interesting carbon squiggles on the pots. These marks are permanent.


Alas, this kind of firing is hard on the pots, here are two that broke. I had great hopes for the amphora.

Thursday, March 5, 2009

Some pottery for March

I've been working on pottery that I will have at AnTir's Kingdom Arts and Sciences event, March 7-8th, 2009. I'm going to have a merchant's table there and hope to also have some of the pottery of my friends Gwen the Potter and blown glass pieces by Aelfgu.

The following pottery pieces are some of my most recent work out of the kiln.


I particularly like this jug. The soft colors are unusual and came out very successfully. The herringbone carved design is French in origin.


This pitcher-type is a very different style from the green and yellow baluster jug above. My spouted pouring vessels like this can also be used on direct heat.


I tried a few different things with this saucepan. It's thrown out of earthenware clay rather than stone ware and it's fired to a lower temperature more like period pottery. Unlike period pottery it has a food safe glaze that I formulated, and then again like period pottery for color I sprinkled some copper filings on the wet glaze to get that green speckle you see.
This pot is also intended for cooking in coals.

A simple cooking pot. Well, it should have been simple, but I couldn't resist carving some surface design on the pot. This will help the user hold onto it when it gets wet too.

Sunday, February 1, 2009

Two Plates

From my last firing I got these two plates. They are very different in style.

The first plate:

I am still interested in portraying birds on my ceramics. This time rather than underglazes, I have done a brown pelican using the champleve technique. Champleve is like scraffito only it is carved deeper and showing more of the clay under the slip. I particularly like the negative space formed by the head and left wing of this bird.


This plate was based on a bowl from the Umayyads of A;-Andalus from around 936 AD. I like it very much, this may be my favotite Medieval design ever. My design is done in underglazes as was the original. Mine, of course, is fired hotter and does not use lead in the glazes.

Saturday, January 3, 2009

It has been cold!

Since my Christmas break began the weather has thrown all kinds of cold stuff at us.
Deep snow, blowing winds, and low temperatures. The 100 feet between my house and studio sometimes has made me feel like Admiral Bird trying to get back and forth. This past week I have been able to spend time throwing pottery in the studio and things went very well. My studio heats with wood so it takes some time every morning to warm it up enough to work in it. But this morning I saw that the mercury dropped considerably the night before, meaning that I came into the studio to be greeted by this:

Frozen pottery. Imbeded with ice crystals. When they thaw they will collapse.