Monday, September 12, 2016

Some completed Roman Oil Lamps

I have been using the Roman Oil Lamps.
All that are on this page are thrown on the wheel as shown on the previous entry, handles pulled and then the pot decorated with carvings or stamps and carving. After they were fired I poured in a layer of tung oil so they wouldn't ooze oil. Tung oil works great for this.

I use a simple cotton string for the wick and for fuel I use olive oil, inexpensive stuff that I picked up at the Dollar Store. It has a pleasant smell while burning and the additional advantage of not being as flammable as commercially made lamp oil.

This lamp was made with a lion stamp, I didn't use an actual terra sigilatta covering and it is extremely rustic looking. Good for an an early example. I didn't keep it for my collection, this one has been sold.


This is so rustic it could be 2000 years old, but it's one I made from a groggy clay and then covered with a thin red iron oxide layer. The Roman lamps almost always had carvings on the spout. Curlyques were a popular design motif. 


Saturday, October 31, 2015

Roman Oil Lamps

Used throughout the Ancient Roman home for light, oil lamps were plentiful, with many extant pieces and their molds available in museums, and photos online and in books. So naturally, I had to make them too.


I was asked how I make my Roman oil lamps. Written answers are not as easy to follow, so these photos taken in progress may be a better explanation of the process.
Most of the examples I have seen photos of are oil lamps that were made from molds. But of course, there had to be a handmade original oil lamp from which the mold was made. This process shows how I made mine, they are similar to how the Ancient ones were constructed I would say as an educated guess. I plan to make a mold of one of these, but first I want to make a number of lamp shapes to choose from.  

Step #1 the basic shape. Thrown on the wheel.  Notice how the top is concave. An awfully lot of extant oil lamp tops are concave, many more deep than this. I think many  from History were thrown because the bottom section of the lamps show a strong, smooth curve. This would be easily made by an experienced thrower. But making the shape from a pinch or coil pot would work too.

Roman oil Lamp shape, the first

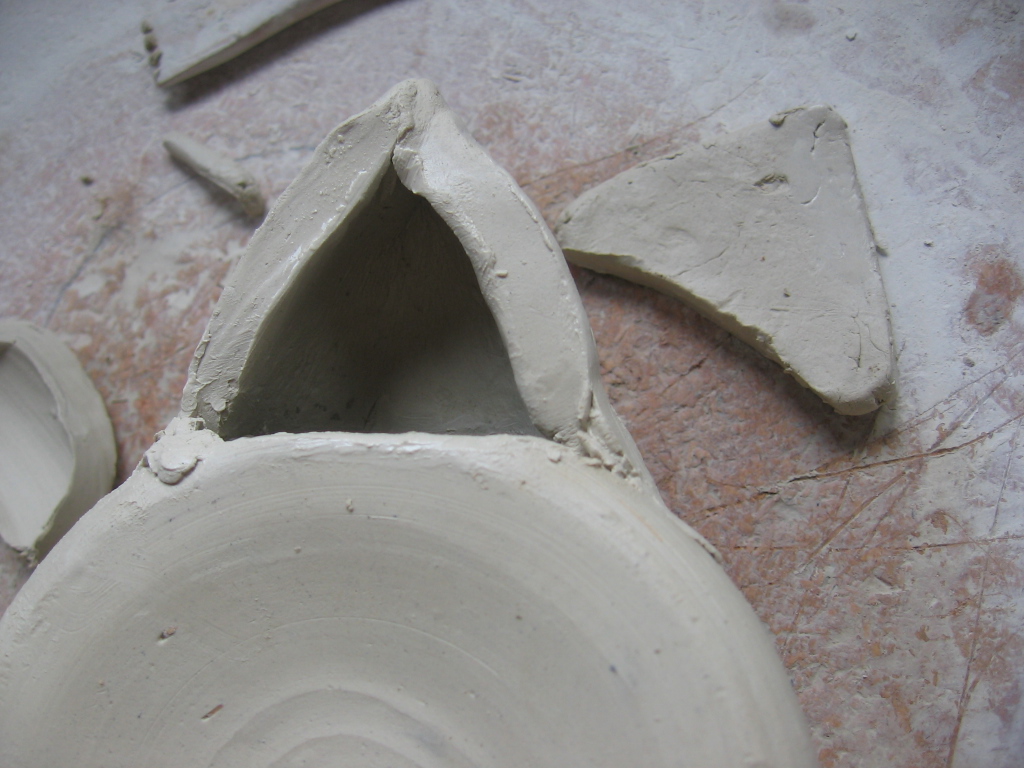
Using the same clay, I rolled out a small slab in a rough,  trapezoid shape. The clay is about 1/4" thick, which is plenty thick enough. 

Now the pot has dried to leather hard, although I have always favored the British term “cheese hard”.  The slab was roughly pinched into a cone shape for the spout. I measured it against the body of the pot, adjusted the shape a little so it would fit, drew around the "spout" onto the pot, cut an opening, then slipped and scored both the spout and the pot before sticking them together . 

The spout and body are pushed together. It looks awful now, but it will improve, I promise.
 The end of the spout is closed because I will make an opening hole for the wick in the top of  the spout rather than from the tip like a teapot spout. 

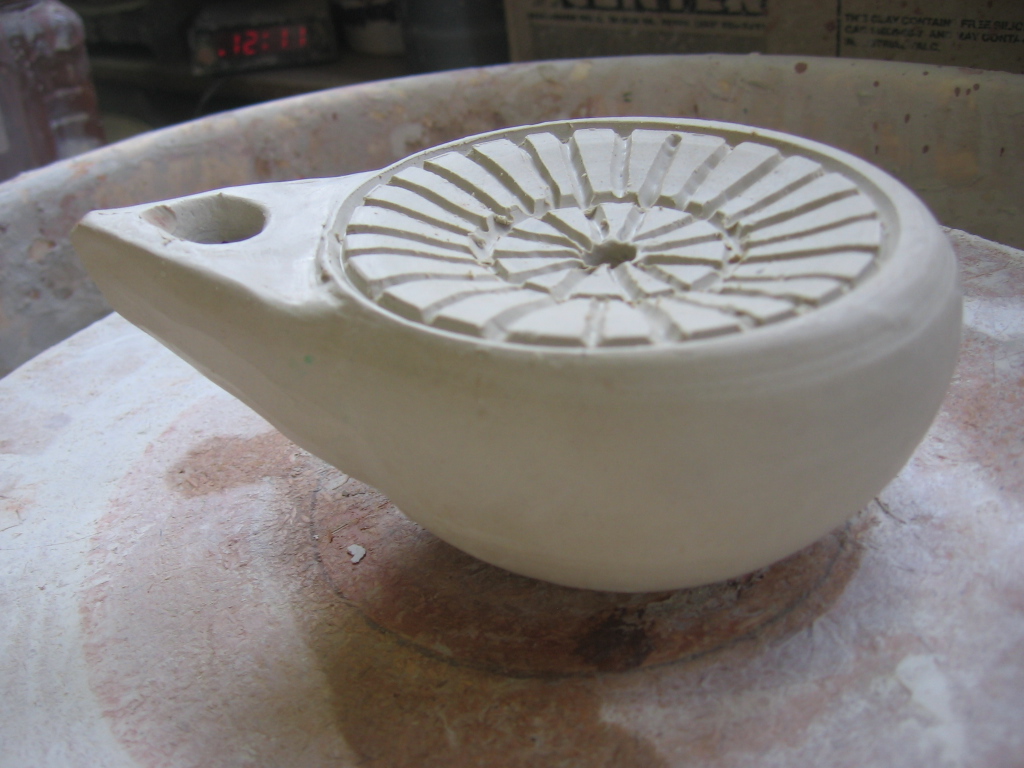
The finishing work has started. Smoothing, shaving, a stamp added, carving, the top hole opened for filling  of the oil; and then the spout hole for the wick. Often the top fill holes are seen off to the side and not exactly in the center, although sometimes they are, and the mouth of the lion stamp was too perfect to resist for this fill hole. The clay needs to dry more before the finishing touches.

 Dry enough that I could add a pulled handle, more finishing, carving on the spout, and clean up of some of the decorative lines. It still will need to be drier before being fired in the kiln.

Roman Oil Lamp the Second

Not a great deal of difference with this Oil Lamp. The primary change is the shape of the spout, which really isn't all that different either.
Same shape for the body. The spout is shorter, more triangular, and with a flat top. The hole is measured, cut and slipped and scored like the first example.

 The base of the spout is pressed over the hole and they are smoothed & firmly attached. The top of the spout will be slipped and scored on the edges and also smoothed and pressed so it becomes one piece.

This is an awkward stage. Bleah. Now to let it harden enough to work some improvements.

Smoothed out and the “discus is decorated in a radial design.

Handle attached, spout carved. One of  my favorite aspects of these lamps is how often the spouts are carved with various curly ques.

5 ready for the kiln. I don't plan to glaze these, I haven't seen that done. I will leave some plain clay, apply some red slip or terra sigillata to others, as I have seen examples of  all those used.

 Refrences: http://www.metmuseum.org/collection/the-collection-online/search/253480
Roman Britain by John Ward
The Real thing, Roman Oil Lamp from the 1st. Century CE


Tuesday, March 3, 2015

Albarello jar in Maiolica


This is also a reproduction of one of the works of Master Nicola Francoloi from Durata. Done sometime between 1520-25This time the maiolica is on an albarello also known as a 'pharmacy jar'. During the time these were used to store drugs and herbs in. The original had a banner that referred to the concoction which had nothing to do...in so far as is known, with the Belle Donne pictured on front. I think the yellow shapes on the foliage are flowers, they look similar to pears too, but hang like flowers rather than fruit.
My copy skipped the drug name, but is also done in maiolica and will be fired at a low-fire temperature as was the original.

I have been working on maiolica to display in the AnTir Arts and Sciences Competition. These will not be in the competition itself, but on show along with Sine McDonald who is a wonderful, wonderful maiolica artist and will be displaying her masterful work alongside of mine. I am quite honored that she wanted to show with me.

This takes place next weekend, and I will have pictures to post after that.

Thursday, February 26, 2015

Maiolica re-creation plate.

My most recent maiolica attempt. It is so recent that it is now in a cooling kiln along with its cousins and I am anxiously waiting for them to cool to see if magic happened. It's very hard to wait, but if I try to speed the cooling up a little the risk is breakage.

I enjoyed doing this plate very much. I used primarily just one overglaze and made washes of it to get the variety of shades of blue. The one exception is a bit of blue-green overglaze on the left of the picture. 

You can see the original which was my inspiration. The original plate was from Deruta, Italy, made sometime between 1520-1525.  I would love to find more examples of blue monocolor plates. There must be some out there.... surely.


The base maiolica glaze is a non-leaded modern glaze I mixed to look as much like the original glaze that I could, only safe from lead fumes and leaching.

Wish me luck.


Sunday, February 15, 2015

Maiolica Majolica 7

This time I am posting some of my majolica. The designs from Hispano-Moresque ceramics are often different than those of Italian maiolica. Lots of palmettes and pomegranate shapes, influenced by Middle Eastern pottery designs, but still overglaze on a tin glaze base.
A considerable difference is that so much of majolica was glazed with a beautiful luster and was fired in a rather complicated method of firing. There are very pricy commercial luster glazes available that contain real gold, but it would take quite a bit to cover one ceramic piece and is not at all practical. I will probably do one real gold luster piece someday.
Today I present bowls.


In this bowl, I chose one of the shapes of Hispano-Moresque bowls as well as the design.

The outside of the piece was also majolica glazed with a design from the period.

Same shape of majolica bowl, very different designs. Kind of a compass star design in the center.


Sunday, February 1, 2015

Maiolica-Majolica 6

This plate is a very close reproduction of what is referred to as a tri-colored Archaic Maiolica plate. Although the original was larger. This is one of my favorites. A very time-consuming plate to do.


This pitcher is an authentic shape, and the design is also a reproduction. The original was from Orvieto, Italy and was done in the 16th Century. The original now rests in the Louvre. It turned out pretty well.

Wednesday, January 21, 2015

Maiolica 5


Maiolica: Now with Grotesques.
Grotesques are the misshapen animals and people that are painted on later period maiolica. Sometimes they are combinations of animals and people, sometimes a large platter is covered with a multitude of these guys. The lanky lion and prancing antelope are my first attempts. I previously didn't have a positive attitude towards grotesques, mostly because of those in sculpture and household furnishings. But I quite liked these and will be doing more.